Keikoyari (training spears) are not obtained easily even in Japan. The author saw a kamayari for sale in a budō equipment shop in Tōkyō just once. And there is only one maker/distributor of wooden weapons who sells kamayari and suyari through his webshop. Recently he ships the spears to destinations outside Japan as well, but they are quite expensive.
So in the end you have to ask a carpenter to build a spear to your specifications. Or just do it yourself. Don't worry. Building a spear isn't that difficult. On the contrary it is a lot of fun, at least for me.
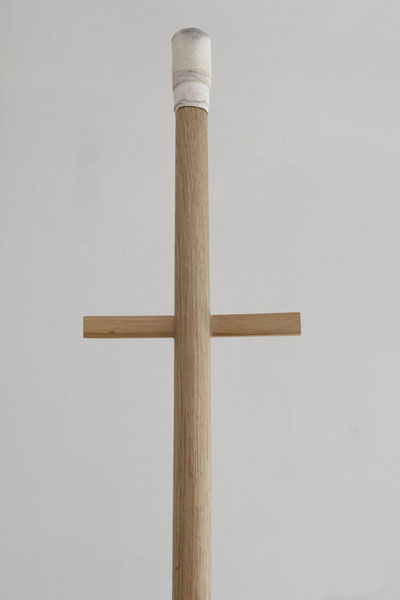 The jūmonji kamayari (cross shaped sickle-spear)
Mesurements:
Length: approximately 273 cm
Diameter: tapers from approximately 32 mm at the ishizuki (butt end of the spear) to approximately 25 mm at the tip
These are the measurements of the spears used in Nara. In Hamburg, Germany we usually use spears which taper from 35 mm to 25 mm or from 30 mm to slightly less than 25 mm depending on the quality of the material available.
Approximately 24 cm below the tip a cross-bar of 16 cm length is inserted in the shaft. Width and thickness of this cross-bar depend on the material used. In the beginning we used the wood, but in the last couple of years we only use bamboo which is the material of choice in Japan as well. In the case of bamboo a width of less than 20 mm and a thickness of approximately 6 - 8 mm is sufficient for the cross-bar and the shaft of the kamayari is not weekened more than necassary.
The suyari (straight/simple spear)
Measurements:
Length: approximately 364 cm
Diameter: tapers from approximately 32 mm at the ishizuki (butt end of the spear) to approximately 25 mm at the tip
These again are the measurements of the spears used in Nara. In Hamburg we usually use spears which taper from 35 mm to 25 mm or from 30 mm to slightly less than 25 mm depending on the quality of the material available.
Spear making
The making of a spear begins with getting the right material. To keep things easy you don't buy raw wood but go for already round bars of appropriate length and diameter. Of course you are not bound to round bars but can use any starting format you like, but this would mean much more work to do. For this reason I will limit the description below to turning (or better planing) a cylindrical bar into a conical one.
Which kind of wood ist suitable for spear making? Wood with long fibres and a high density. In Japan as for most wooden weapons red or white oak is used, which is (nearly) impossible to obtain here. But there is other suitable wood you can get here (with some limitations):
-
Ash - a little less dense than oak. The most easy to obtain wood listed here. Easy to work with. Instead of breaking under stress, ash rather just dissolves along its fibre structure after years of heavy use but can be reglued.
-
Oak - a liitle denser than ash. But the quality of oak you can buy varies a lot. Some spears made from domestic oak last for years while others break very soon.
-
Hickory - would perhaps be the most suitable wood as it is nearly indistructable. I have seen hickory at timber dealers but never in an appropriate length so far. If you should know a source for hickory Sōjutsu.de would be glad to be informed about it.
-
Other wood might be suitable as well but the only one the author has experience with is mahagony. Every expert had warned him as the wood is hard but brittle. But the suyaris made from mahagony that are used at the Alster Dojo proved to be very usable and durable.
After you have bought your wood, you can start working on it. But how to turn a cylindrical bar into a conical spear shaft that tapers from its butt end to its tip? Well, turning would be one way to achieve this. But there is another much more easy way: planing!
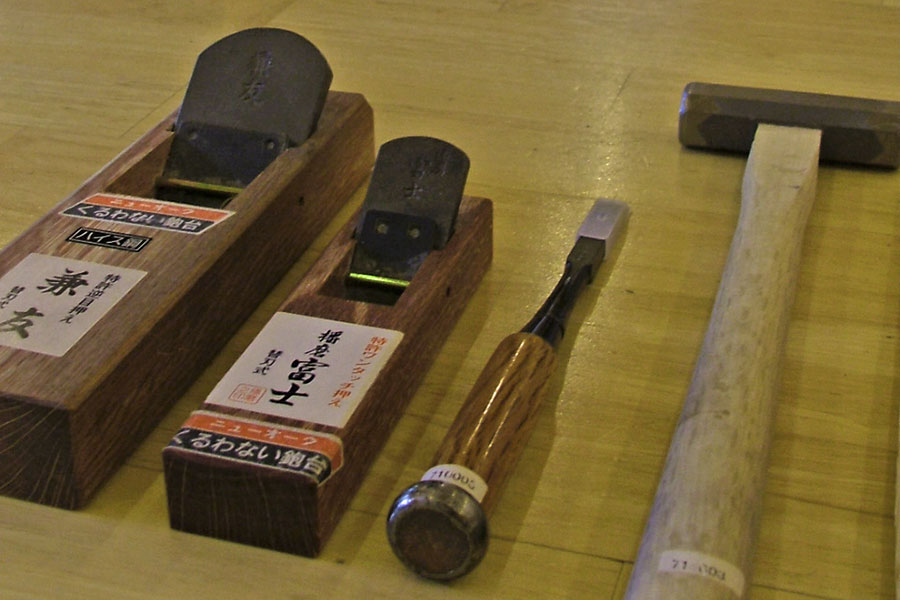 This works best with japanese planes which are not pushed but drawn. This in combination with their razor sharp blades makes the reduction of wood a highly controllable act.
You can work on the spear on every plain surface using the help of a second person which holds the bar while the one operating the plane works his way up from the tip of the spear to its butt end, drawing the plane in strokes that become gradually longer. After every couple of strokes the person holding the spear turns it lengthwise for a few degrees, always in the same direction. This ensures that the wood will keep its round cross section. For convenience both persons working on the spear can change their roles during the process.
Of course you can work in the described manner alone. But this means one of your hands is buisy all the time holding and turning the spear so you have only one hand left to handle the plane which means working this way is much more exhausting and - more important - imprecise.
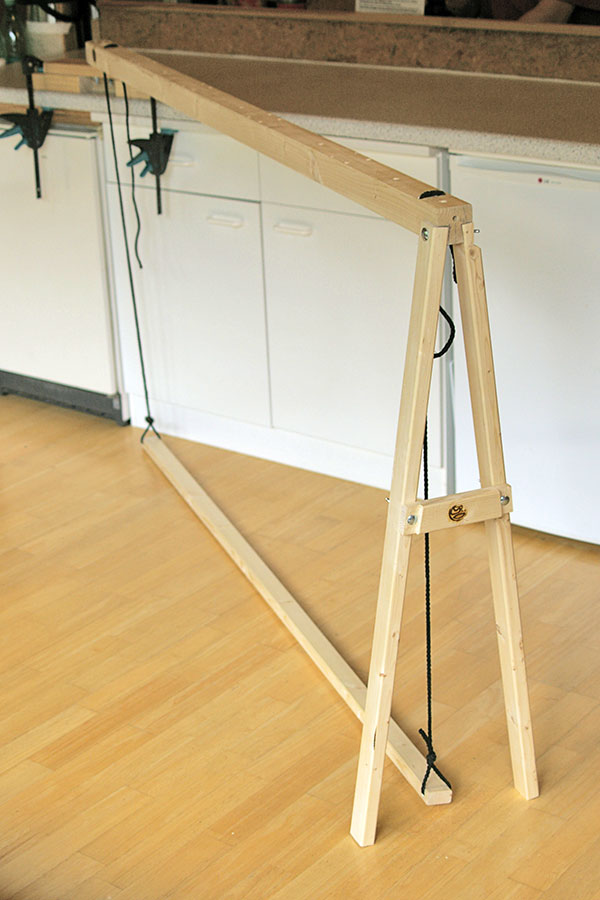 For this reason it is recommended to utilize a workbench like the one shown to the right which the author constructed for the sole purpose of building spears if you have to work alone or prefer to do so. On this workbench the bar that will become a spear is held by two loops which are tightend by stepping on a pedal. This fixes the spear securely. Pins which can be set in various holes along the workbench guarantee for lateral stability or can act as a stop for the tip while working on it. As you use one foot to fix the spear you have two hands free for planing which is done exactly as described above with one exception. As the spear is longer than the workbench you have to slide it forward and backward during the process. My experience is that working with a workbench one person can build two spears in the same time two persons need to produce just one working the way first described.
During planing you should adjust the plane from time to time so the chips become finer and finer as the work goes on. In addition to this you should control frequently if the spear is actually tapering evenly and mainting its round cross section. Finally you adjust the sakigawa (the same front cap that is used for kendō shinai) to the tip of the spear or better the tip to the sakigawa. If necessary you then can smooth the surface of the spear with sandpaper or blades. The use of a chinese tool called pingflot carrying eight vertical blades in a row has proved very helpful.
If you want you can round the edge of the butt end a little. Then the only thing left to do is to mount the sakigawa to the shaft and you are done. At least in the case of a suyari.
If you are building a kamayari you still have to make the cross-bar and to insert it into the spear shaft.
The best material for this cross-bar (the sickles) is bamboo. It is hard, flexible and durable at the same time. I am talking about bamboo like it is used for kendō shinai. Actually the author uses the lower parts of broken shinai for the kama (sickle) because at this point the bamboo slat is wide and strong enough. Prior to cutting the slat to its final length you flatten it on its inner side again using a plane. You do this in a way that the cross-bar tapers slightly from one end to the other. This makes for a tight fit in the shaft without using wedges or glue. A thickness of approximately 6-8 mm is sufficient for a cross-bar made from bamboo. Now you plane down the sides of the cross-bar until you end up with a rectangular cross section. Finally you cut it down to a length of 16 cm.
How you open the hole in the shaft of the kamayari is completely up to you. You can chisel it out or use a drill and rasps. What is important is that the hole has to be right-angled to the annual rings of the wood. Otherwise the cross-bar would split open the shaft at once if under stress. Finally the measurements of the hole should correspond to those of the cross-bar to ensure a tight fit.